Custom executable
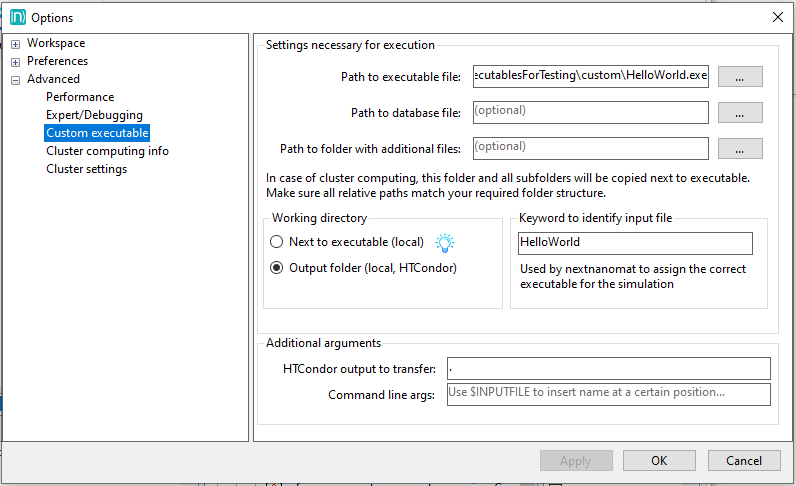
Figure 1.2.11 Settings for custom executable.
In the settigs shown in Figure 1.2.11 a custom executable can be defined, to be executed by the workflow manager nextnanomat.
Note
This is no default use-case for nextnanomat and should only be used by advanced users. Additionally, as it is a nice-to-have feature only, support regarding this feature is limited.
Most executables which can be started by command line, can be started by nextnanomat. This allows the usage of the batch list for polling and job execution control, as well as the visualization of output results (if the format is supported) or comfortable editing of input files. In many cases a combination with our cluster computing feature HTCondor is possible.
After defining the path to the executable as well as the working directory, a keyword identifier is necessary.
- In case your executable needs input files:
You need to find a common string within these files, thus nextnanomat can choose the correct executable for each job execution.
- In case your executable does not need input files:
You still need to create some dummy files as placeholder or job submission files. The keyword can be arbitrary.
For example the HelloWorld executable (see Figure 1.2.11),
which is executing a fixed script independent of input variables,
can be started by submission of a text file containing HelloWorld.
This enables the workflow manager nextnanomat to start and monitor the execution
and to collect the results.
Optionally a path to a folder structure or the database can be defined,
if the executable needs additional files during execution.
Specific command line arguments can be added at the bottom of this settings tab.
The variable $INPUTFILE will insert the filename of the actual input file
at the specified position of the command line arguments.
If it does not work as wished for,
we recommend to switch the flag output additional debug info on (Expert Seetings).
The log then contains the command line arguments nextnanomat uses to start the application.
Thus allows you to debug easily.
Example: How to run TiberCAD from nextnanomat
To run TiberCAD you need to finish its installation and put your TiberCAD license file into the respective folder. Move the example or your personal input files to a folder with write permission. Choose the following settings in the custom executable tab, Figure 1.2.12:
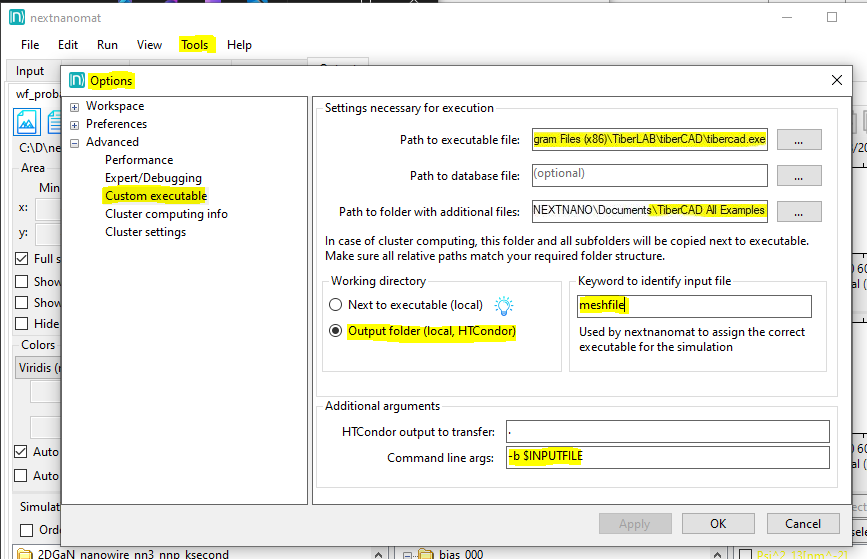
Figure 1.2.12 Settings to run TiberCAD as a custom executable.
Note
A special folder has to be created, which contains all input .tib, geometry .geo and mesh .msh files on the same hierarchy level. The path to that folder needs to specified in the settings for the custom executable.
This enables the editing - including syntax highlighting - of the input files within nextnanomat. And furthermore the parallel execution of input files (see Figure 1.2.13) and visualization of the output.
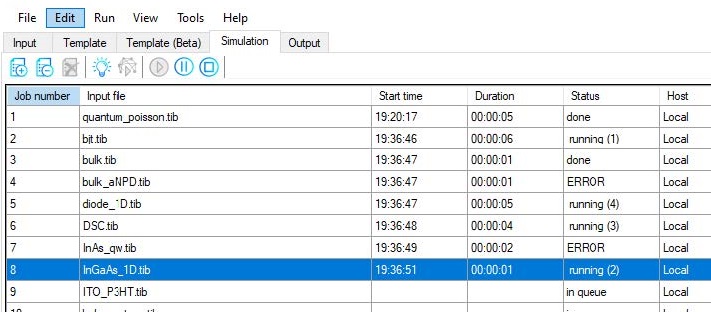
Figure 1.2.13 Parallel execution of TiberCAD files by the nextnanomat Job Manager.